Fallout New Vegas
XP Glitch
When you have to deal with Powder Ganger leader Joe Cobb in Goodsprings, you have the option of killing Cobb and his Powder Gangers or siding with Cobb to take over Goodsprings.
The "XP Glitch" is an option which is a combination of the other options in which you do not side with either party but instead, side with yourself.
Here are the steps:
- Offer to help Cobb take over the area. He says to meet him outside.
- Ask him for supplies for the Powder Gangers.
- He will resist which gives you a speech check with which to coerce him.
- He agrees and gives you leather armor and some 9 mm rounds and 25 XP.
- The speech check doesn't go away, so you can repeat it indefinitely.
- loot the gang's bodies, each of which gets leather armor (but not ammo) for every repetition.
You can also use this time to sell armor back to Chet. If he runs out of caps, you can wait
24 in-game hours 3-4 times to give his stock and caps time to replenish.
This will let you sell off the armor without having to haul it to some other vendor, but as
Tom Petty once sang: "The Waiting Is The Hardest Part."
If you do this, then when you level up, put all your points into Barter to maximize your return.
- except that the Powder Ganger bodies will disappear.
- On each even level, you also have to choose a Perk.
Since the next step in this walkthrough, is changing your setup, these choices don't matter
except that choosing the three levels of Swift Learner gives you more XP on each repetition
which allows you to level up a little faster.
Changing Your Specs When Leaving Goodsprings after the Glitch:
Each SPECIAL ("Spcl") has two effects as shown in the list below.
- STR: Melee [Additional effect: The amount you can carry; the weight of weapons which can be handled]
- PER: Explosive, Lockpick, Energy Weapons [The distance at which enemies show on radar]
- END: Survival, Unarmed [# of Hit Points, # of implants, poison/radiation resistance]
- CHR: Barter, Speech [Increases Companion armor and attack strength]
- INT: Science, Repair, Medical [Number of points when earning XP and when leveling up]
- AGL: Guns, Sneak [Number of AP you get for VATS; speed of drawing/loading weapons]
- LCK: Each point of LCK (Luck) adds 2 points at every other level. all skills increase by 1 on odd Levels; e.g.: 5,6=13, 7,8=14. [Critical Chance]
- Adding to a Spcl with an implant or Intense Training adds 2 points to those Skills
which is really trivial, so I mostly ignore the Skills effect of each Spcl.
- These effects are actually more significant than the points given to skills because
the first are a one-time boost while the second continues to affect the whole game.
For example, STR only adds points to Melee and I never use Melee., but STR also
determines how much weight you can carry. Since my walkthrough involves taking
ED-E and Boone, who can carry a lot of loot, I could live with a much lower STR,
but moving loot back and forth to ED-E and Boone is a nuisance and even at that,
they sometimes max out how much they can carry, and I pick up lots of loot.
But the Strong Back perk lets you carry 50 pounds more. A STR implant only adds 20.
Strong Back requires Level=8, STR=5, and END=5, which is what I set them to anyway.
Another consideration is that the Anti-Material Rifle, which I like, requires 8 STR.
However, at level 16 you can get a perk which reduces gun weight requirements by 2.
So I can start with STR=5 and use an implant to make it 6.
While the A-M Rifle is more accurate with STR=8, you can use it at lower levels of STR.
But that some perks require a particular SPECIAL to be at a
specified level, For example, the perk Better Criticals requires a minimum PER of 6.
But I rely on weapons such as grenade rifles and missiles for which crits are insignificant.
PER's ability to show enemies on radar at further distances is made unnecessary by
Boone's beret which is why I reduced PER to 1.
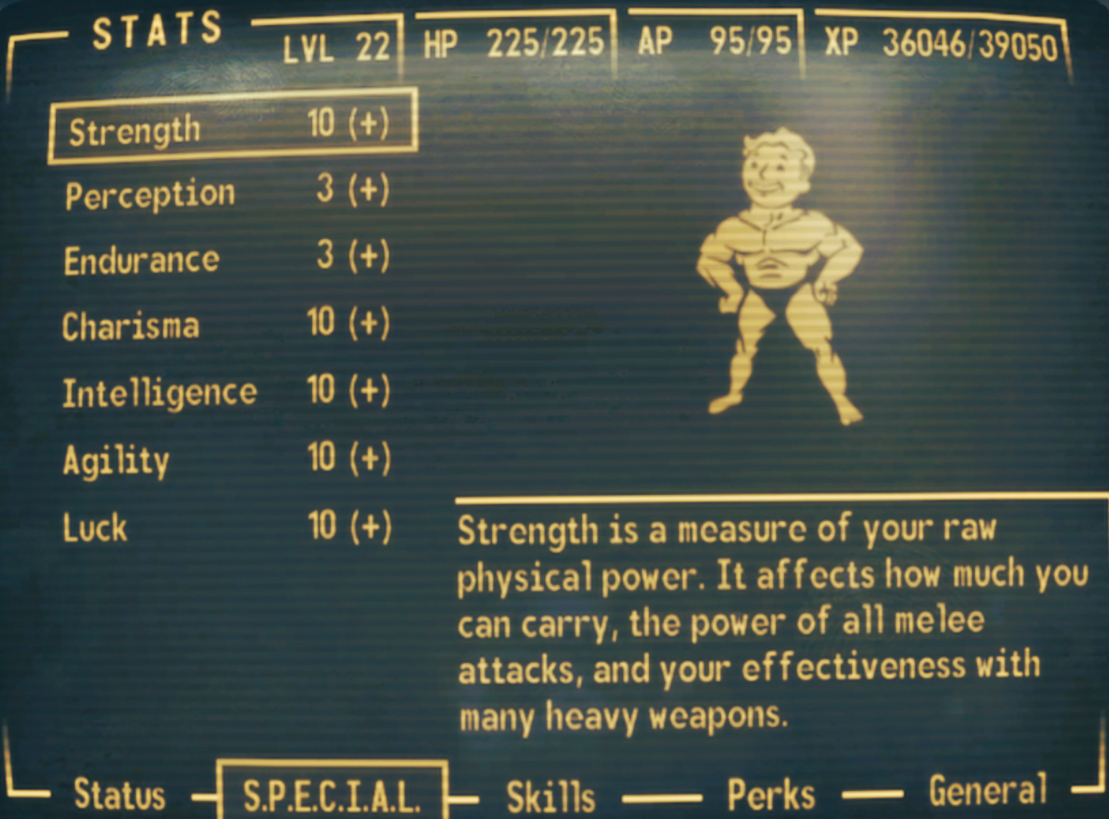
CHR, INT, and AGL I set high because their additional effects (described above) are all
important.
New Specs When Leaving GS:
| STR | PER | END | CHR | INT | AGL | LCK | |
| Usual | 5 | 6 | 3 | 5 | 10 | 6 | 5 |
| Post-Glitch | 5 | 1 | 5 | 5 | 10 | 7 | 7 |
When leaving GS and having to reset my specs, I looked up a game in which I didn't use the Glitch ) to see what my Skill points were at Level 16, and that is shown below. I entered these points for Skills when leaving GS.
| Barter | Energy | Explos. | Guns | Lockpk | Med | Melee | Repair | Science | Sneak | Speech | Unarmed | Survival | 50 | 15 | 67 | 75 | 75 | 49 | 15 | 35 | 55 | 23 | 53 | 16 | 7 |
Once you leave GS and have reset your specs, you can pretty much follow the steps in the Walkthrough. Although the level and associated skill points are higher, the enemies scale up to match, so it's still challenging.
The main difference is that you don't have to grind over getting Skills up to the levels needed for cracking hard locks and terminals early in the game. For example, in our original walkthrough, after leaving GS, we head straight for Lonesome Road where ideally we would want to get our Level up to 4, Lockpick skill to 75, Science to 30, and Barter as high as we could get both afford the Riot gear and to build up excess caps. (See the Walkthrough - Lonesome Road.)
Having used the Glitch, you can see above that we don't have to worry about those things.
Long-Term Effects of the Glitch:
In the early goings, the higher Glitch specs don't really break the game, but the screen shots below show how overpowered you become at Level 22 - just six levels up from the level we were at leaving GS:
We made the trip to Novac per the Walkthrough, recruited Boone, then headed up to the Medical Center for implants, then to McCarran to do those missions, then back to Freeside to do those, and that's pretty much it. We haven't done Repconn. We picked up the Boomer mission but haven't started it yet, so there's still a lot to do, yet here's what are specs are at Level 22:
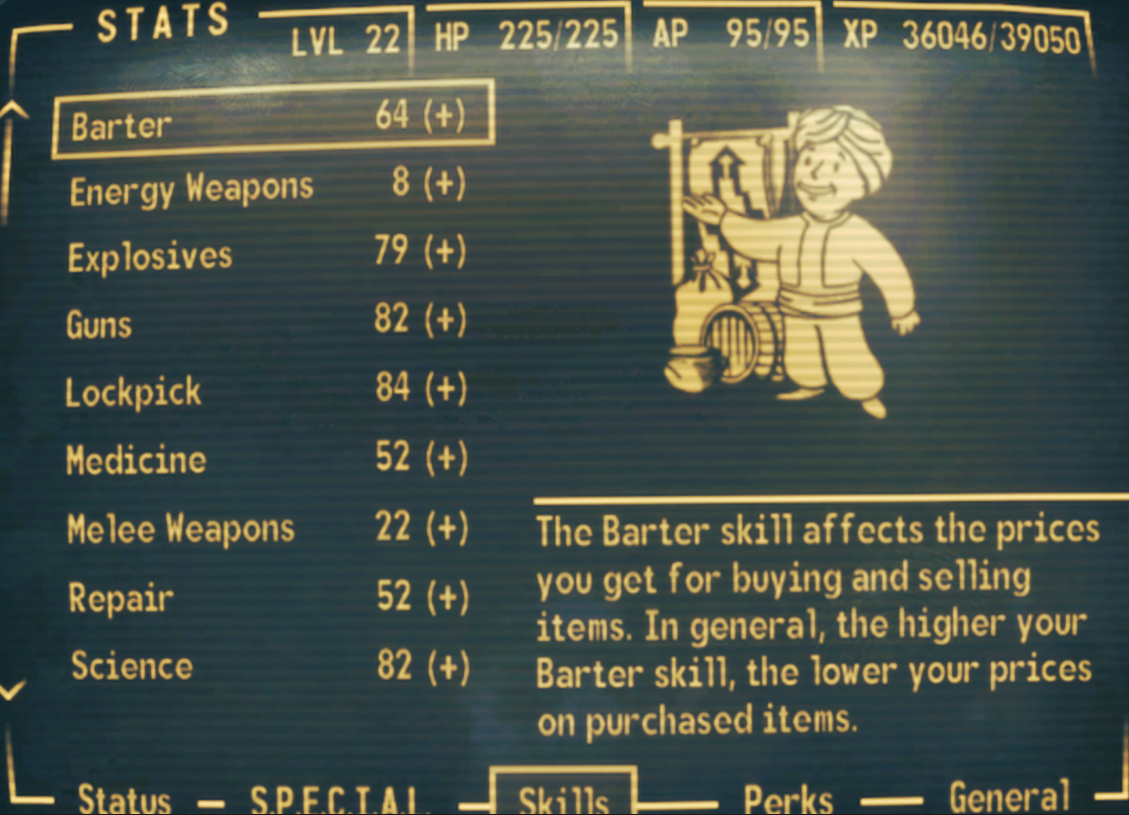
Guns, Lockpick, and Science are all at 80+ and a skill magazine with Comprehension will take them to 100. Explosives would go to 99, but it also has 3 perks which increase explosive damage, but I never add a magazine when using explosives.
Barter, Medicine and Repair are all lower, but there is no real reason for the to be higher.